

The Raspberry Pi is a small, cheap and cheerful computer which was originally created to teach schoolchildren to learn how to write programming code. It is roughly the size of a pack of cards and has no hard disk or moving parts. Instead, it boots straight from a micro SD card on which software has been installed. Happily for those of us who are no longer at school and don’t want to do sensible things, it can be turned into a retro games console within a relatively short space of time. The success of the NES Classic Mini, which Nintendo never made enough copies of, shows that there is a lot of interest out there in retro gaming. Seeing as I spotted one of NES Classic Minis for sale the other day for €250, a “home made” version is a nice work-around. Not to mention it being a way to avoid rewarding the greedy gougers who bought those rare little consoles, simply to sell them on at grossly inflated prices. Grrr. Rant over.
Retropie is the software I will be using. For want of a better description, it’s a collection of emulators for various retro computers and consoles, all bundled into one user friendly system. The list of systems it emulates is quite extensive I’m not going to paste the whole lot into here or this page will go on forever. Let’s just say that if you can remember the panic over the Millennium Bug, the computer/console of your youth is likely to be included in Retropie. In theory, the older versions of the Pi (Models 1 & 2) will work with this but really, the newest model is the only game in town. It is much faster than its predecessors and comes with built-in wi-fi, bluetooth and four USB ports. For most people who’ve done any sort of messing around with computers at all, they will have most of the peripherals at home anyway. I set mine up on a computer running Windows 10 and it was a pretty straightforward process.
What you will need (hardware)
- Raspberry Pi3, Model B. They can be bought in some shops (e.g. Maplin) but I rarely see them anywhere else. I bought mine online
- Micro SD card. Minimum 4gb but but the bigger, the better. Yeah yeah, size matters and all that.
- USB Keyboard
- HDMI cable
- Monitor or TV with HDMI port
- USB joystick/gamepad
- A Wi-Fi connection and your Wi-Fi password
What you will need (software)
(All of these are free downloads)
*Ahem. This is where you move into that grey/illegal territory. All I’ll say is only download the games you originally owned back in the day. Or better still, make images of your original games which you still own.
Getting Started
- Install the Win32 Disk Imager and the SD Card Formatter on your PC.
- Unzip the Retropie file
- Insert your Micro SD card into your computer.
- Unplug any external USB storage devices from the computer (a precaution)
Formatting the SD card

When it comes to formatting the SD card, you can of course use the standard Windows formatting tool. However, it’s better practice to use the free SD formatting tool as supplied by the enigmatic sounding SD Association. It will give the memory card a more thorough formatting and will remove any partitions and modifications other devices may have made to it.
Installing Retropie on the Micro SD Card

- Open up the Win32 Disk Imager program. Select the unzipped Retropie disk image (it should have a .img extension)
 Click the “Write” button. You will be given a warning which is nothing to worry about unless you’ve got something else apart from the memory card plugged into the computer… After a few minutes, the Win32 Disk Imager will finish installing Retropie onto the memory card. It is now bootable and ready to be popped into the Raspberry Pi.
- Connect the Raspberry Pi’s power supply, keyboard, joypad and HDMI cable. Turn on Raspberry Pi and the TV/Monitor.
I’ve turned it on. What now?

- On boot-up, Retropie will ask to configure the buttons on your joystick/joypad. It’s fairly straightforward and if you mess it up, just plug out the power and restart it 😉 For this, I used an old joypad I’ve had for years and it worked fine. If you’ve got a spare Playstation, X-Box or Nintendo controller lying around, they will work too.
- A configuration screen will appear next. Using the joypad, navigate to the very last item on the page – Wi-Fi. Select your Wi-Fi network, type in the password and reboot the Raspberry Pi.
 Once the Raspberry Pi has been rebooted, bring up Windows Explorer. Type \retropie into the address bar. All going well, a screen like the one above will appear.
- Open the Roms folder and you will see a long list of folders named after old computer systems contained within it. Simply copy the rom files for the games you wish to play into the folder of the computer/consoles they belonged to.
- Restart the Raspberry Pi.
- What you will notice when you reboot into RetroPie is that you can now see the system(s) which now have roms. You an easily choose the game you wish to play from the menu.
- To exit from a game, press the Select and Start buttons simultaneously.
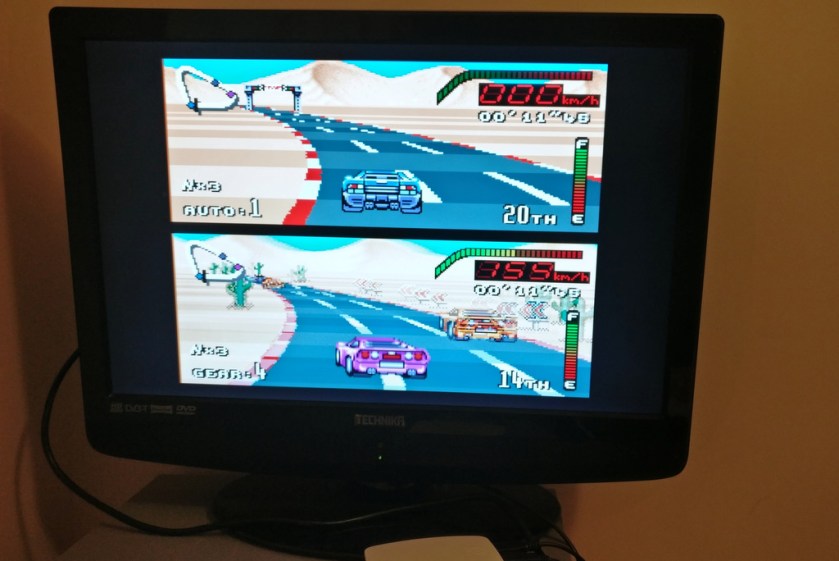
- Depending on the size of the memory card you used for this, you could potentially load on a lot of retro games. I have not got around to testing them all out yet but to date it has been mostly good. The only console it has struggled to emulate has been the N64. Goldeneye runs with the speed of an arthritic snail on it. Other games were fine.
Some observations/notes (as much for myself as anyone else 😉 )
Where’s the sound?
I don’t know if this is an issue for other people but I could get no sound from my Raspberry Pi. To resolve it, I put the Micro SD card into the computer, opened up config.txt in Notepad and removed the # from in front of the hdmi_drive#2 text

Why aren’t all the supported computers and consoles on the main menu?
In order to keep the size of the original Retropie download down to a mere 600mb, it doesn’t bundle all of the systems on the original install file. The additional ones can be added later
I’m going to use a different emulator for the Amiga
I love the Commodore Amiga. I wrote my B.A. Thesis on an A600 back in the day – no wonder my eyesight’s gone to pot! My favourite Amiga emulator is Amibian so it merits a memory card all of its own 🙂

